Thursday, February 21, 2013

The "CTW" Jar of Consequences

Hi! It's Jilly. Lately the kids have been a leeeeetle crazy, to say the least. Seems like I'm always telling them to go to time out. Maybe it's a 7 year-old thing. I dunno. It's driving me a little nuts, though.

I saw this cute "Uh Oh" jar floating around Pinterest and I thought it was a great idea. Basically, you fill the jar with slips of paper with different consequences on them, and when the kid gets in trouble they have to pull out a slip and do whatever it says.

The CTW Jar from Hi! It's Jilly

I had the kids help me come up with a name for our jar. We decided on the "CTW" jar. CTW?! What does that mean?! Well, we are Mormon and a popular saying in our church is "Choose The Right", or "CTR". The kids get little rings in Primary (the children's program) with CTR on them to help them remember to make good choices. It's kinda like "WWJD".

Colored CTR shield

So, that's why the kids chose "CTW" for the jar, because they have to pick out a slip when they are making a wrong choice...CTW. Get it? Ha ha!

I have all kinds of things in the jar. Wash a door. Do 15 jumping jacks. Sit in the corner for 7 minutes. Pick up 10 pieces of garbage. Mop the floor in the hallway. Lay on your bed and breathe deeply for 3 minutes.

The possibilities are endless. Use your imaginations!

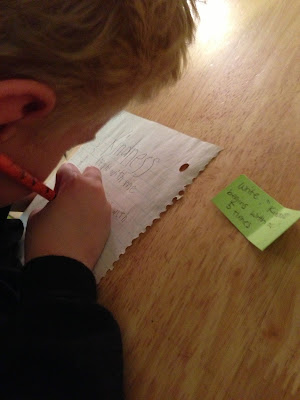
Here's Michael performing one of the tasks after whining about doing his homework. He had to write "Kindness begins with me." 5 times.

Hi! It's Jilly. Doing a consequence from the CTW jar.

I'm hoping this jar helps curb some of the craziness. We'll see. Hopefully it will help you guys out!

Sign up for my newsletter so you don't miss a post! Or follow along on Facebook. :)

If you like this, pin it!

Tuesday, February 19, 2013

Better Than Starbucks Salted Caramel Hot Chocolate

Hi! It's Jilly. It's snowing again here which can only mean one thing. Well, it can mean lots of things, but the thing we are going to talk about is HOT CHOCOLATE!

I love hot chocolate. Seriously. I would marry it. No, I wouldn't. That would be just weird. But, I do love it a lot. It's super tasty, and it also reminds me of some of my awesome friends from Arizona, so that makes it even better.

A while back I had my first Starbucks hot chocolate EVER. Yes, shocking I know.

Hi! It's Jilly and Starbucks Hot Chocolate

It was delicious, but I thought to myself, "I could make this better and cheaper at home." So, I did. And now you can, too.

Better Than Starbucks Salted Caramel Hot Chocolate from Hi! It's Jilly

Ingredients:
A packet of hot chocolate mix
Water or Milk
Salt
Torani Caramel syrup
Vanilla Caramel coffee creamer
Vanilla Extract (optional)
French Vanilla marshmallows (optional)

Let's do this thing!
Better Than Starbucks Salted Caramel Hot Chocolate Recipe

1. Measure out a little salt in your hand
2. Add it to a packet of hot chocolate mix in a mug. Stir.
3. Add 6-8 oz hot water or milk. Then pour in 1-2 tsp of Torani syrup.
4. Pour in some vanilla caramel coffee creamer. You can also add a splash of vanilla extract if you like.
5. Top with marshmallows and you're all set! (I love the French vanilla snowman ones.)

Better Than Starbucks Salted Caramel Hot Chocolate from Hi! It's Jilly

Enjoy your delicious and cheap hot chocolate! Sign up for my newsletter so you don't miss the next post!

Linking to: White Lights on Wednesday, Crafty Spices, The DIY Dreamer, Romance on a Dime, Cornerstone Confessions,  , Handy Man Crafty Woman, Milk and Cuddles, My Favorite Finds, My Turn For Us, Wait Til Your Father Gets Home, Sincerely Paula, The Thriftiness Miss, The Grant Life

Thursday, February 14, 2013

Valentines Heart Hair Clip

Hi! It's Jilly. My hubby has to work until 9 AND he's on-call, so it's just me and the kiddos tonight. Happy Lame-en-tines...

We watched a chick flick together last night to celebrate (Return to Me, one of our 'special' flicks. Have you seen it?! It's awesome!). But, half the movie I was busy putting together the kiddos' Valentines. Funny how things change over the years, eh?

Last night I also made some hair clips for the girls to wear today. They are SOOOO ridiculously easy. I'm not even kidding. Took me, like, 5 minutes. 10 tops.


What do you need?
2 pieces of felt in 2 different colors (I used hot pink and red.) The cheap sheets from the craft store are perfect.
Hair clips/alligator clips
Craft glue
Hot glue gun with glue in it (Obviously. Won't do you any good w/o the glue in it, right?!)


The Tute:

1. Cut 2 hearts out of a square of felt, one a little smaller than the other.

2. Glue the smaller heart to the bigger heart.

3. Glue a button in the center of the smaller heart. Wipe off the excess glue that squooshes out of the button holes.


4. Cut a scrap of felt big enough to cover the alligator clip. Clip the hair clip onto the felt scrap.

5. Squirt hot glue all over the backside of the clip & felt.

6. Press the felt and clip down onto the backside of the large heart.


That's it!! I told you it was super easy! You might even be able to whip one up before the kids get home from school!


I hope you all have a fabulous (not lame-u-lous) Valentines Day!

Don't want to miss the next post?! Sign up for my newsletter here or follow me on Facebook. :D

Visit thecsiproject.com
Linking to: SaltTree

Wednesday, February 13, 2013

Two Last-Minute Valentines with Free Printables!

Hi! It's Jilly. If you're anything like me, you probably aren't done with your kids' Valentines for school tomorrow. Well, have no fear. Jilly's here! This morning I put together a couple of Valentines for my kiddos, and I made a FREE printable for you!


In the party favor aisle at Wal-Mart they have a a 32 pack of jumping frogs for $1.97.


My son loved the idea of giving out those frogs to his class, so I came up with this cute little Valentine. I used this fun font called "Hornswaggled" for the 'toad'ally awesome part.


Go here to get the free printable.

I thought the font Penmanship Print was so sweet for this "You're the 'write' one for me" Valentine. Love it! The pencils were 97 cents for a 12 pack, also at Wal-Mart. 

Go here for the free printable.


Hope you have a 'hoppy' Valentines Day!!

** Like what you see? Then follow me on Facebook, Twitter, or Pinterest
I also like the hang out on Instagram. **


Tuesday, February 12, 2013

I'm BACK with an Upcycled Tights Wreath

Hi! It's Jilly!! As many of you know, for the last month or so I have been on a Social Media Fast. I was not posting on my blog, Facebook, or Twitter! And, let me tell you, it was AWESOME! It might sound cheesy, but it was so liberating! If you've never done it, you should give it a try! It was nice to not feel like I needed to "keep up" with everyone else and be attached to the computer 24-7. I had some really great responses from some of my friends about the fast, too.

Now, some of you might be thinking, "Hey! I still saw you posting pics on Facebook all the time!" Well, I was still posting pictures on Instagram, which I then shared on Facebook straight from the Instagram app (so I guess I wasn't off of all social media), but I wasn't updating my status, scrolling through other people's updates, etc. I really like documenting our day-to-day on Instagram. Definitely one of my favorite apps!

The break has been great, but I have missed blogging, and I have SO many awesome post ideas buzzing around in my head, that I felt like it was time to bust back into the land of the (online) living!

One of things I've been itching to share with you is this cute wreath I made. I wanted to share it before Valentine's was over!


Guess what it is made out of?!?! Two pairs of tights that no longer fit my girls and a cereal box. Pretty sweet, eh? Let's get to the tutorial, shall we?


1. Use a frisbee or any decent-sized round thing around your house to trace your circle on the cereal box.

2. Cut the legs off of the old tights.

3. Cut off the toes.

4. Cut out your circle, then cut into your circle so you have a place to feed the tights onto the wreath.


5. Feed the tights onto the wreath like you are trying to put socks on a little kid.

6. After you have all your tights pieces onto the wreath, fluff it out a little to make sure it looks good.

7. Staple the cereal box together so you have a continuous circle.

8. Fluff the tights some more so they are covering the cereal box. Add a cute ribbon at the top to hang it by. I also snapped one of the girls' hair clips on the bottom there to add a little somethin' somethin'.


And there you have it! Step back and enjoy your ridiculously easy and cheap holiday wreath. One thing I like about it is that you can use it for Valentines, Fourth of July, or Christmas! Just switch out the hair clip on the bottom and you're all set!


I hope you enjoyed this little tutorial. If you like it, then you should put a pin on it. ;)

 I can't wait to share with you the other great things I have up my sleeve!


Linked to: My Favorite Finds

LinkWithin

Related Posts Plugin for WordPress, Blogger...