Showing posts with label Series. Show all posts

Friday, September 13, 2013

The Paper Lunch Bag Wreath from Kim at Bugaboo, Mini, Mr, and Me.

Hi! It's Jilly. Our contributor today is a friend of mine from High School! Now we're all grown up and have blogs of our own! Well, "grown up" is all relative, right?! I can't wait for you to meet Kim and see the cute wreath she's whipped up for us!

Hi!  I'm Kimberly - the "me" over at bugaboo, mini, mr and me.  My blog is a peek into all my creative endeavors - successes and failures! - and includes a little of everything: creating with kids, lots of different crafts, sewing, baking and cooking, some DIY/power tool type stuff, a little photography, and writing.  I'm really excited to be here guest posting - and especially excited for the theme because it gave me a chance to make a little door decor, which I haven't done in a long time.

I used to think that making wreaths was something old ladies did with plastic flowers and weird wicker baskets and such.  I had zero interest in that type of "crafting."  Once I started my blog and was looking for new ways to be unique and creative with my crafting, I realized you can make a wreath out of just about anything... And they've been some of my favorite creations ever since!

Today, I'm going to show you how to make:

The Paper Lunch Bag Wreath from Kim at Bugaboo, Mini, Mr, and Me. Part of the Fall In Love With Fall Series at Hi! It's Jilly

Which, ironically, includes some fake floral stuff.  Ha!

The Paper Lunch Bag Wreath from Kim at Bugaboo, Mini, Mr, and Me. Part of the Fall In Love With Fall Series at Hi! It's Jilly

So, let's get started!  Gather all your supplies!  You can make the basic Paper Lunch Bag Wreath with the items below:

The Paper Lunch Bag Wreath from Kim at Bugaboo, Mini, Mr, and Me. Part of the Fall In Love With Fall Series at Hi! It's Jilly

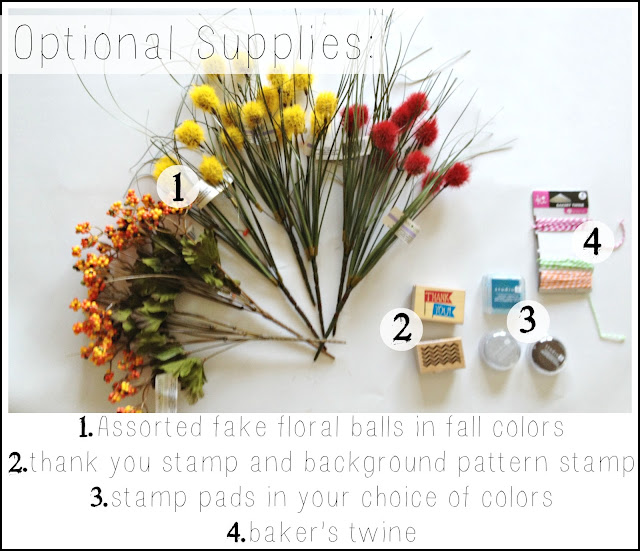
And you can make the "supreme" version (the one pictured) with the additional optional supplies:

The Paper Lunch Bag Wreath from Kim at Bugaboo, Mini, Mr, and Me. Part of the Fall In Love With Fall Series at Hi! It's Jilly


A note about supplies.  One thing I try hard to do is keep my crafting affordable.  We're all on a budget right?  So my number one tip for wreaths is to check out your local thrift stores for wreath forms.  My local store usually has styrofoam and straw wreath forms regularly and they are $0.75!!  Which is awesome compared to like $12 at Michael's.  

For this specific wreath, my form is a 10 inch squared edge form (but you can totally use any kind of foam form) that I got at the thrift store.  I got "giant" paper lunch bags at Walmart for just over a dollar for a 300 pack (they are slightly larger than normal lunch bags).  I found the crepe paper leaves at the dollar store.  They came in packs according to color, so if you want a multi-colored wreath like the one pictured, you'll have to get more than one pack.  I got four, each pack has 10 leaves.  I have a ton left over for a different craft now!  The floral ball shaped thingies are from the dollar store as well.  The stamps came from JoAnn's in their $0.99 bins, and the mini stamp pads and the twine came from Walmart in their $1.00 craft bins.  SO.  There's your shopping list, in case you needed some ideas...


Prepare your bags:


The Paper Lunch Bag Wreath from Kim at Bugaboo, Mini, Mr, and Me. Part of the Fall In Love With Fall Series at Hi! It's Jilly
1.  Keeping the bag flat, use your scissors to cut across the top (where it's all jaggedy) and to cut the bottom off.

2.  Slice the bag open down the middle seam on the back.

3.  If you opened it up now, it would look like this.

4.  Fold it all up on the folds and then fold it in half.

5.  Cut it in three (somewhat) equal pieces.

6.  Take each piece, open them up and then crumple them.


I needed three bags to cover my wreath form (9 strips), you may need a few more or less depending on the size of your form and how crumply you keep your strips when applying them.


Wrap the wreath:


The Paper Lunch Bag Wreath from Kim at Bugaboo, Mini, Mr, and Me. Part of the Fall In Love With Fall Series at Hi! It's Jilly

1.  Begin with your naked wreath form.  Pick which side is the back and lay it backside up.
2.  Put some hot glue right on the form.
3.  Straighten out one of your paper bag strips slightly (leaving some of the folds and wrinkles as is) and smoosh it down into the hot glue.
4.  Wrap it around the front of the wreath, then tuck it under to the back.  When you are wrapping, make sure to overlap the paper a little and also keep it rumply. 
5.  When you run out of strip, add a line of hot glue along the end.
6.  Push the paper strip down onto the wreath form.
7.  Now, take a new strip and add a line of hot glue to one end.
8.  Smoosh it down onto the wreath, overlapping the end of the last strip.  Place it at a slight angle to help it lay flatter as you wrap.
9.  Wrap and wrap until you run out.
10.  Hot glue the end down.
11.  Continue adding strips with hot glue, overlapping, crumpling and sometimes twisting and smooshing a bit, until the form is completely wrapped.

Adding leaves:
The Paper Lunch Bag Wreath from Kim at Bugaboo, Mini, Mr, and Me. Part of the Fall In Love With Fall Series at Hi! It's Jilly

1.  Begin with your wrapped wreath form.  Again, you'll need to decide which is the front and which is the back.
2.  Pick a leaf to start, put a little hot glue on the back.
3.  Press it down onto the wreath, anywhere.  Hold it there for a moment.
4.  Voila!  A leaf!  Pull up the edges a bit.
5.  The best part about these leaves is that they have wires for veins.  So before you add them to the wreath, crumple them up a bit.  Bend them and shape the edges.  Most fall leaves aren't perfectly flat, are they?
6.  Plus, you can curl the stem, which looks cooler than a long straight lame stem.
7.  Put some hot glue on the back.
8.  And add it to the wreath right next to the previous leaf.
9.  You will want to overlap your leaves.  Place them at different angles and in different spots along the wreath.  Bend them into each other.  Continue adding them and filling in holes until the leaves cover a little less than half of the form.

And you could totally stop here!  This would make a perfectly pretty fall wreath for your door.  Just:

10. Tie a piece of twine in a loop.  Place the loop under the wreath form.
11.  Pull one end of the loop through the other end and tighten.  Add a dab of hot glue to keep it in place.

And then you can hang it!

But, you could also keep going.

Adding more pizazz:
The Paper Lunch Bag Wreath from Kim at Bugaboo, Mini, Mr, and Me. Part of the Fall In Love With Fall Series at Hi! It's Jilly
1.  Take the little plastic balls and pull them off of the large stem so they are single stemmed and smaller, but still in little bunches.
2.  Add hot glue along the stem.
3.  Poke it down under a leaf.
4.  I places mine at the intersections of leaves - where they overlapped - to hide the glue-y stems.
5.  I also made them more concentrated at the bottom of the wreath, and more sparse toward the top.

Again, you could stop here!  Another perfectly pretty wreath for your door!

BUT.  What about just a leeeeettle more?

Adding even more pizazz:

The Paper Lunch Bag Wreath from Kim at Bugaboo, Mini, Mr, and Me. Part of the Fall In Love With Fall Series at Hi! It's Jilly
1.  Cut your fuzzy ball flowers apart, leaving stems on each one.
2.  Separate them into three piles, one for each color, and then a third pile for a mix of the two colors.  Fan one of the piles out and shape it until you like it, place it on top of a scrap strip of paper bag, squirt hot glue on the stems and wrap the bag around the stems.  This will keep the flowers together how you want them and hide the stems.
3.  Trim the ends of the stems and attach the flowers to the bottom of the wreath (just barely overlapping the leaves) by hot gluing the paper wrapped part down.  Repeat steps 2 and 3 for the mixed color pile.
4.  Pull a few balls off of the last pile of flowers.  Then repeat steps 2 and 3 again.
5.  Once you've glued the paper wrapped stems down to the wreath, hot glue the single balls into any holes of empty spots.
6.  Cut a small section of scrap paper bag and glue it over the last stems sticking out to hide them.

And then you could stop.

But if you're like me, you don't know when to stop.  So why not shnazz it up some more?

Add a banner:
The Paper Lunch Bag Wreath from Kim at Bugaboo, Mini, Mr, and Me. Part of the Fall In Love With Fall Series at Hi! It's Jilly

1.  Cut a piece of twine to fit across the inside of the wreath, with a little extra wiggle room to glue.

2.  Fold a piece of scrap paper bag in half and cut out three triangles and a rectangle.

3.  Use your "background pattern stamp" and a neutral color stamp pad to stamp a background on the pieces.  Mine is brown chevron.

4.  You can use whatever kind of quote or phrase you want for the rectangle piece, I went with Thank You, for a Thanksgiving-y theme.  I used a bright contrasting turquoise so it would stand out.

5.  Open up your triangle, lay a line of hot glue down the middle.

6.  Lay your twine across the inside, making sure the paper piece is where it needs to be, 

7.  and smoosh the triangle closed around the twine.

8.  Repeat this for the other two triangles and the rectangle.

9.  Turn your wreath over and glue the ends of the twine down to the wreath.

10.  To hide the glue spots and make the twine extra secure, glue down a small square of paper bag over each end.

11.  Turn your wreath over.  Done!

And because there's likely no more trends you could possibly add at this point without making it seem completely over the top, you're finished!


The Paper Lunch Bag Wreath from Kim at Bugaboo, Mini, Mr, and Me. Part of the Fall In Love With Fall Series at Hi! It's Jilly


Just hang proudly on your front door and enjoy along with the nice cool fall weather!


The Paper Lunch Bag Wreath from Kim at Bugaboo, Mini, Mr, and Me. Part of the Fall In Love With Fall Series at Hi! It's Jilly


It's my favorite season - I think because of the colors.  I love that this wreath illustrates that.

You might also like some of my other fall-inspired wreaths!  Like: 


OR, my "flavors of fall - dessert edition" which includes recipes for five different yummy fall desserts!


Thanks for asking me over, Jillian!  Hope to see you all at my blog, or you can find me on facebook and pinterest!

Okay, how cute is that wreath?! Must. make. one. now. Thanks for the shopping tips, too. I never would have thought about getting wreaths from the thrift store!

To check out the rest of our Fall In Love With Fall Series, click that little button below. So you don't miss the rest of the series, follow me on FacebookTwitter, or Pinterest, or sign up for my newsletter and get each new post straight to your inbox!


Fall In Love With Fall Series full of great Fall projects & recipes on Hi! It's Jilly. #fall #series

Monday, September 2, 2013

Spelling out FALL with Jeannie from For What It's Worth

Hi! It's Jilly. I am excited to welcome Jeannie from For What It's Worth on the blog today! What a great start to our Fall in Love With Fall Series! She is such a sweetheart, and her project is so cute and easy, which is my favorite kind of project! Let's see how she made it!


One of the first bloggers I started following was Jillian on this very blog.  I can’t tell you how happy it makes me to be guest posting on her site!

My name is Jeannie and I started blogging at for what it’s worth a year and a half ago.  At that time I was anticipating retirement and following advice to have a bucket list of activities to complete.  What started out as a journal has evolved into a passion and motivator to fill my life with fun.  I moved from putting my dreams and ideas in a paper bound journal to making them real as I shared them on my blog.  I get inspiration from nature, family and fellow bloggers like Jillian. 

Because the summer season has ended and fall is so close you can smell it (literally) I’m sharing my first day of fall project that will go from last year's mantel to this year's guest bedroom decorations. You only need an afternoon to complete the entire project from gathering the materials to creatively displaying them.

First, I’m going to put on some soup while we craft to keep hubby from wondering if we’ll have dinner.  Heck, I’ll even share the link where you can get the recipe.  After all it's my favorite season...soup season!

Mouth watering, appetite pleasing Tortilla Soup


So, with some old frames, fabric, craft paper and alphabet letters…let’s decorate!

Remove the glass from your frame collection and spray paint with a unifying color.  Mine are a hammered brown color but wouldn't copper be pretty?  While they dry, dig through your old craft papers and  fabric stash for some great fall colors to go under the glass.

Now that the frames have dried about 30 minutes, reassemble with the background colors under the glass.  I used a combination of purchased letters and homemade.  You could also use stencils to cut letters from cardboard or if you have one of those cool Silhouette machines [I covet] you can make some fancy vinyl letters.

Attach the letters on top of the glass and start decorating.  You can see the progression of the season on my mantel here as it went into October.  Have fun, and come visit me at for what it's worth.  I'll make some pecan pie for you.


Thanks for sharing your cute project with us, Jeannie! You've inspired me to dig some of those unused picture frames out of storage! 


Sunday, September 1, 2013

Fall In Love With Fall Series - September 2013

Hi! It's Jilly. September has arrived!! Before we know it Fall will be in full swing! What better way to celebrate than with a month-long series full of fun Fall crafts, decor, and recipes?!

Fall In Love With Fall Series on Hi! It's Jilly. A month-long series full of crafts, decor and recipes for Fall! #fall #autumn #series #homedecor #recipes


I have some fabulous bloggers lined up to share some fantastic projects and delicious food with you all month long! Be sure to subscribe to my newsletter or follow me on Bloglovin' to see all the great posts.

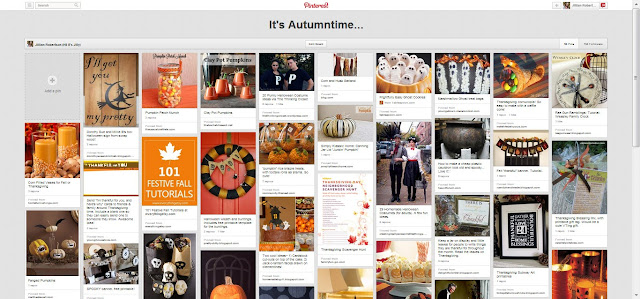
You can also follow my "It's Autumntime" board on Pinterest, where I'll be pinning all the projects in the series, plus any other great "fall"ish things I find!

It's Autumntime Pinterest board by Hi! It's Jilly

So, join me this month as we Fall in Love With Fall! I can't wait till you see all the great things coming up! :)

Bloggers: If you'd like to contribute to the series, there are a couple of spots left up for grabs! Shoot me an e-mail at hiitsjilly@gmail.com for more information. We'd love to see your post!


Wednesday, December 5, 2012

31 Days of Christmas Music: Day 5

Hi! It's Jilly. The 31 Days of Christmas Music marches on!


Our song for today is a melancholy one. It always makes me think of family and friends far away. This version by Josh Groban is especially tear-jerking, even more so if you or a loved one has served in the military. Enjoy...and don't forget the tissues!


Follow me on Facebook or Twitter so you don't miss tomorrow's song!

Tuesday, December 4, 2012

31 Days of Christmas Music: Day 4

Hi! It's Jilly. It's Day 4 of 31 Days of Christmas Music.


Today's song is kind of different. We used to sing it every year in children's choir. It's called "Tomorrow Shall Be My Dancing Day". It is a traditional English carol. This arrangement is by John Rutter, one of the best writers of choral literature around!


For those of you familiar with this piece, or any who would like to learn more about this carol, I found some neat information about it on ACDA's website. (ACDA= American Choral Directors Association)

Come back tomorrow for our fabulous Day 5 song!

 Need a reminder? Then "like" me on Facebook!

Monday, December 3, 2012

31 Days of Christmas Music: Day 3

Hi! It's Jilly. It's day three of the 31 Days of Christmas Music series!


Today's selection is White Christmas. Many versions of this song have been done. I love the classic by Bing Crosby. You can't have a proper holiday without listening to Bing! Here is a clip from the 'debut' of this song.

 White Christmas first appeared in the movie "Holiday Inn", not "White Christmas" like most people think. Have you seen Holiday Inn?! Ah, it's a classic. You have to see it! It stars Bing Crosby AND Fred Astaire. Need I say more?!


And, if you are a child of the 80s like me, your holiday isn't complete without also hearing the version of White Christmas by The Drifters, which was used in the iconic 1990 movie "Home Alone". 

I could NOT, for the life of me, find a clip of Kevin singing it into his comb in the bathroom! You'll have to use your imagination,...or just watch the whole movie. You know you want to, anyway.


Check back tomorrow for our next installment of 31 Days of Christmas Music!

Do you like me on Facebook yet?! If not, go ------> HERE

Sunday, December 2, 2012

31 Days of Christmas Music- Day 2

Hi! It's Jilly. Welcome to Day 2 of my Christmas Music series!


Today's song is near and dear to my heart. I sang it in choir many years ago, and it has stuck with me ever since. Many of you may not be familiar with it, but it is a gorgeous song called "What Sweeter Music".

The part of the song that really stands out to me is:

"We see Him come and know Him ours
Who with His sunshine and His showers
Turns all the patient ground to flowers
Turns all the patient ground to flowers.

The darling of the world is come.
And fit it is we find a room to welcome Him
To welcome Him."

When we were rehearsing this song I was very emotional. I was going through a lot in my personal life, and when I sung those words it moved something deep inside my soul. I knew that the Lord was aware of me, that my struggles were for my benefit, and that I just needed to be patient and "find a room to welcome Him".


(

Saturday, December 1, 2012

31 Days of Christmas Music- It's a Series!

Hi! It's Jilly. Can you believe it's already December 1st?! Me, neither! SO wild!

Music has always been a big part of my life, and I LOVE Christmas music. As a performer you usually start working on it by about October! To share with you my love and excitement for Christmas music I decided to start a new series...31 Days of Christmas Music!


Each day I will post a video of one of my favorite sounds of the season. I might even add a little story along with it. Hopefully I will post ones you love, and maybe you will find a new favorite!

To kick off the series, let's listen to Have Yourself a Merry Little Christmas sung by Michael Buble. Michael Buble. Aahhhhh... My kids can recognize his voice and yell, "It's Michael Buble!" whenever one of his songs come on.


I hope you have a merry little Christmas, or whichever holiday you choose to celebrate this time of year! Come back tomorrow or follow along on Facebook to see the rest of the series!

Wednesday, September 26, 2012

13 iPhone Apps “iExcited” To Try Out

Hi! It’s Jilly! We’re on day three of our iExcited week! Today I’m going to talk about some of the apps I’ve been excited to use with my new iPhone. Before I got the phone I started researching and made a list of the apps I might want to get. Some of them I downloaded pretty soon after I got the phone, others I waited a couple days, and others I haven’t quite downloaded yet. And, all of these apps are freeeee! When you are swimming in med school debt, free is a good price. ;)

13AppsIExcitedAbout

The first couple of apps I got were, of course, Facebook and Twitter. My husband doesn’t Tweet, and he rarely gets on Facebook, so he doesn’t get the appeal, but I like it. (I actually set up his Facebook account for him years ago!!)

Facebook App Icon 

BTW- did you know there is a Facebook app called Facebook Pages Manager that you can use to manage any fan pages you may have, like for your business or blog?! It comes in pretty handy.


Next was Instagram. Loving Instagram! And, my kids love for me to take pictures with it so they can change the colors. I could see myself getting a little carried away and taking random pictures of EVERYTHING, so I’m trying to rein myself in a little bit so I don’t drive my friends crazy! Ha! If you are on Instagram you should follow me so I can follow you! (My user name is hi_its_jilly, but I have no idea how to link to that! Newbie----> right here)

Edited to add: I found out how you can follow me! Here's ya go. Follow @hi_its_jilly


As many of you know, I am a HUGE Harry Potter fan (as I mentioned it in this post). So, one of the apps I was excited to try out was the Harry Potter: Spells app. It’s a free app, and you can practice your spell-casting. The graphics are cool, and I love being able to open the app and hear Hedwig’s Theme at my leisure. It’s an easy one for my kids to play, too.

One of the first apps I downloaded was the LDS Gospel Library. It contains all the scriptures, including the Bible, so it’s not just for Mormons. It also has a topical guide, study helps, and a Bible Dictionary. Another cool feature is the Notebook, so you can highlight different passages & write notes to yourself with insights you’ve received while studying. SO nice to have on the go! You can also download the hymn book, children’s songbook, and class manuals.


I actually used the Primary manual on my phone on Sunday, when I was asked to sub for a class halfway though sacrament meeting! (Sacrament Meeting is when we take the sacrament (like communion) and listen to speakers (like a sermon). After Sacrament Meeting is when we have Sunday School and the children’s classes.)

An app I heard a lot about was Evernote. I love the little elephant on the icon! An elephant never forgets, right?! Evernote is cool because it’s like a notebook you can write things in, put pictures in, and put in links to websites, all on your phone. And, you can sync it with your laptop or PC, so you can access your ‘notebooks’ from everywhere. You can also have shared notebooks, so you can easily share ideas and information with other people. For example, if you were planning a party you could share recipes, decor ideas, etc with everyone involved in the planning. You can also e-mail notes to people, or share them on Facebook or Twitter, or print them! See, a ton of uses for it!


Another app I’m excited about is MyFitnessPal. A while ago I was using My Fitness Pal to track my food and exercise, but since I was doing it on my computer I’d get distracted and it would take me forever to log my stuff. Now with it on my phone I can just log stuff as I’m doing it. I really should start logging my food again… (I say as I eat my Xth piece of quick bread/breakfast bar/whatever this yummy thing my husband brought home from work is called)


One app you HAVE to have is Genius Scan! It’s like having a scanner in your hand! You take a pic of the documents and it saves them as a PDF or jpeg, then you can e-mail it or share it online. Plus, it enhances the image, so it doesn’t just look like a picture of a piece of paper. It actually looks like a real document! I just used it to make a copy of our lease, then e-mailed it to myself and my husband, because I’m always losing it when we need it. (Why not just file it in a safe place, you ask?! Uhm…I have a hard time organizing. That’s a WHOLE can of worms you do not want to open up!)

I’ve been using Cozi to organize our family’s schedule for years, so I was excited to have it available on my phone. (Well, when I say ‘using it for years’, I mean that every so often when I get the bug to actually be more organized with my family’s schedule, I turn to Cozi). Now I’m happy to have it all in one place, especially since it syncs with your online account. And, you can look up recipes & create shopping lists both on your computer and on your phone through their site. Another cool feature is reminders from the calendar automatically texted to your family members.


A couple other apps I’ve heard great things about are RedLaser and Jingit. Both are great apps if you are a shopper. With RedLaser you can scan any item and it pulls up the price of that item at all the local stores, so you can find the lowest price. With JingIt you can ‘check-in’ while shopping, and it will give you products to scan (and sometimes do a survey about), then give you money for it!


One last app you need is GasBuddy. When you open the app it finds your location, then gives you a list of all the gas stations close to you and their gas prices. Nice to have, especially when gas prices are SO high nowadays! Sheesh! I remember when I was in high school and gas hit $1.39. We were all livid! Now it’s, what, $3.95?!?! Aye yie yie…


So, there you have it, folks. A run down of some of my favorite apps. I’m sure there will be many
more in the future!

Join us tomorrow as Jenna from Call Her Happy talks to us about 5 Tips to Parenting with an iPhone.

Be sure to follow along on Facebook or Twitter so you don't miss anything else!

Oh! And run over to enter the S'Wonderful September Sponsors giveaway happening now! Tomorrow's the last day to enter, and there are some grrrreat prizes!

I might be linking up with these parties. :)

Tuesday, September 25, 2012

Ode to iPhone- Guest Post from Esther at Esther Norine Designs

Hi! It's Jilly. Our iExcited week continues with this awesome poem from Esther at Esther Norine Designs!

Here's her Ode to iPhone.

Ode to iPhone.
Your usefulness knows no bounds.
You take care of all my tunes.
Your apps number in the millions and I love all of the ones I have and have yet to discover.
My email at my fingertips and Facebook a tap away.
Losing you would be a tragedy.
I won't let that happen...again.
Dear sweet iPhone, your home is in my purse or hand. Never recklessly put on a table. Dear sweet iPhone, please work tirelessly forever for me.
Ode to iPhone.

Ha ha! Isn't that clever! I love it!

Be sure to come back tomorrow when I talk about apps "iExcited" to use with my new smartphone! You might find one among them to love!


Got an iPhone 5, and “iExcited”!!

Hi! It’s Jilly. On Saturday I got the iPhone 5. Guys…I am SOOOOO excited!! It is my first. smartphone. EVER! What a way to start out, huh?! There are so many things to learn about iPhones! Aah! I hope I can keep up!

Jilly with iPhone 5

When my husband handed me the box I was grinning from ear to ear. If we hadn’t been in the middle of the Verizon store I probably would have looked more like the beginning of this video:


Because I am SO excited, I thought it would be fun to do a week-long series all about smartphones! I’m calling it the “iExcited” series. Clever, eh? Ok, maybe not very clever. But, I thought it was kinda cute.

ANYways…because it is my first iPhone, my hubby and I were debating whether to get the 4 or 4S for me (since it would be free for the 4 and $99 for the 4S), or to bite the bullet and get the 5.

Here is the link to a spec sheet comparing them, in case you are trying to decide whether or not to upgrade.

But, this is all you really need to know about whether you need to get the iPhone 5 or not. More cat! Lol!


Join us tomorrow for a guest post from Esther at Esther Norine Designs-- Ode to iPhone.
Follow along on Facebook or Twitter so you don’t miss any of the great posts during  iExcited week!
And, go HERE to enter the awesome S’Wonderful September Group Giveaway!
See you tomorrow! :)

Thursday, July 12, 2012

Moving Tips- Part 4

HI! It's Jilly. It's finally the post you thought would never come...Part 4 of our Moving Tips Series! We moved from Arizona to New York, and now that I'm getting a bit more settled I have just a few more things to share with you. Hopefully it will help some of you out!

First, did you know you can price match your moving truck?! All the big companies- U-Haul, Budget & Penske- want your business and are willing to beat their competitor's prices to get it. So, you can get a written quote from one company, take it to another company, and they will match or beat the other company's quote!

Some people like the fact that U-Haul has the lower truck bed, so you can get a quote from Penske or Budget, then take it to U-Haul and they will beat it. This is a great way to save yourself some moola on your move.


You can also save money on the truck rental by booking online. Most places give you a 10-20% discount. Plus, they usually have discounts for students, military, AAA, AARP, and other things. Look for promo codes online. Be sure to explore all your options and all the ways YOU can get a discount. Moving is not cheap, my friends!


image courtesy of FreeDigitalPhotos.net

We got our truck from Penske this time. They didn't have our truck the day we reserved it for (grrrr...). But, they gave us a huge discount as an apology, plus gave us an extra day, since we had to move our truck-loading help back when they didn't have our truck on time. So, in a way, not having the truck on the day we reserved it may have been a blessing in disguise, because it saved us even more money on our ridiculously expensive move cross-country.

Another way to save money on your move? Get boxes from local grocery stores. Some of the best boxes come from the produce department. Get apple and orange boxes, because they come with lids and are nice and sturdy. Check your local health store, because they usually have more produce boxes. In the Phoenix area we have Sprout's and Whole Foods. 


We got some great boxes from Albertson's. At the stores in Phoenix they call them "Ponca" boxes, because they are shipped from Ponca City, OK. The boxes come with hair & body products in them, and other non-food items. They store them flat in the back near the baler. 


Ponca boxes are great because a) they give them to you flat, so you can fit more of them in your car when you pick them up, and they take up less space in your house while you are packing, b) they are all the same size, so the stack well together in the truck and in your house, c) they are nice, sturdy boxes, and d) they are free. Mwahaha!


My friend, Pam, suggested making a schedule when preparing to move, i.e. Monday- Master Bedroom, Tuesday- Office, Wednesday- Kitchen, etc. This is a great idea, as long as you stick to your schedule. I am terrible at keeping myself on track. Hence, one of the reasons we left FOUR DAYS LATE! Granted, we left a little later because we had a lot of little projects to finish up on our house before we sell it, but still... If I'd stayed on schedule we would have been a LOT better off! Then I might not have looked like this because I was sleep-deprived and running on Dr. Pepper.


As a comparison, this is me at the park with my kiddos the other day, not sleep-deprived and running on Dr. Pepper. Ok, well maybe a little sleep-deprived. I am a Mom, after all. ;)


The last tip is good for anyone, but is especially helpful when preparing for a move. Do you have a pile of stuff you want to get rid of & donate, but don't want to/can't/don't have time to take it somewhere? Well, many of the places that take donations- like Goodwill, Deseret Industries, and The Salvation Army- will come out to your house and pick-up your donations. You just call them, schedule a pick-up date & time, then put your stuff out in front of your house. Everything from clothes, housewares, and toys, to bigger items like furniture, they will accept. Then you know your stuff is going to help people in your community, not just going in the trash. Plus, it's a tax write-off! 


We had DI (Deseret Industries) come out TWICE to pick-up a huge pile of stuff. SO easy!

That's the end of our Moving Tips Series. I hope at least one of these tips will help your move go a little smoother. If you missed the rest of the series, follow the links below.

Moving Tips- Part 1 Moving Tips Part 2 movingtips3pin

And, I feel like I need to add a disclaimer here...just because I'm giving you all these tips does NOT mean I am a pro! I felt like I was in WAY over my head! Not everything I wanted to get done before I left got done. Not every road-trip activity I envisioned was made. Not every box was perfectly marked. (That's Ethernet cable, btw. Yeah...)


So, when trying to move don't let yourself get discouraged if things aren't going according to plan. Life happens. Unexpected road-bumps get in your way. Just go with the flow and do what you can to make it go smoothly, then just let the rest go. It will all work out somehow, I promise!

moving tips 4


Sometimes I link up with THESE parties.

Check out the rest of the series!

Hi! It's Jilly: Moving Tips- Part 1

Hi! It's Jilly: Moving Tips- Part 2

Hi! It's Jilly: Moving Tips- Part 3

LinkWithin

Related Posts Plugin for WordPress, Blogger...